


Should You Format Your Own Book?
An Overview of the Book Formatting Process for Indie Publishers


Having agonised over the content of your book, roped in beta readers, perhaps even paid for editing and shelled out for a striking cover design, book formatting may come as an afterthought, and something for which you may not feel that you need to hire a professional. After all, how hard can it be? And can’t it all be done in Microsoft Word?
What Is Formatting?
In answering the question of whether or not to pay someone to do it, it would first help to clarify what exactly is involved. I’m using the term “formatting” loosely here to describe the general process of designing the interior layout of a book – the margin sizes, style and size of typeface, alignment of the text, line spacing, and so on – but you may also hear talk of “typography”, “typesetting” or “setting”, “laying out”, or more generally “book design”. Each of these terms has slightly different meanings,1 but for simplicity’s sake I’m just going to call it “formatting”.
Now, in all likelihood, you’ve used Microsoft Word or some other word-processing programme in order to draft your book. Such software usually allows you to make formatting decisions quite simply and easily, and even if this involves the odd bit of head-scratching and cursing, isn’t this preferable to paying someone a not inconsiderable amount of money to do it for you? Well, that depends.
Firstly, how much head-scratching and cursing are you willing to put yourself through? And even if you are pretty tech savvy, there is also the question of how much you know about the various conventions and rules that traditionally determine what good book formatting looks like. Do you have an eye for a pleasing layout? Do you know your widows from your orphans? Your kerning from your tracking? Your verso from your recto?
Furthermore, programmes such as Word are limited in certain respects that you should be aware of, and you may find yourself lacking the sort of fine control needed to produce a top-rate product.
Let’s have a closer look at the various considerations and decisions that go into formatting a book, and the choices that a formatter has to make. (By the way, each of these really deserves its own post – which I’ll do at some future point.)
The Elements of Formatting
Trim Size
Even if your book is a fairly standard piece of prose, such as a novel or a memoir, there are a bewildering array of possible print formats (trim sizes) that you can use. These range from the exotic and the ungainly, through to a number of standard sizes that seem only to vary by small measurements, but each of which may be considered “the standard” for a particular marketplace (US, UK, etc) or even genre (thrillers, literary fiction, textbooks, etc). The choice of trim size also affects the cost of printing your book in terms of how many words will fit on a page, so there is an economic consideration here too.
Margins
As a self-publisher cognisant of costs, you may be tempted to opt for the minimum margin that your printer will allow. But while smaller typographical margins might increase your financial ones, they don’t necessarily make for a pleasant reading experience. So what size is right for you? How big should you make the inner (gutter) margin, so that text doesn’t get cut off when the book is bound? What’s the optimum number of lines/words per page?
Typefaces
There are similar considerations when choosing the style and size of typeface.2 Most books use a serif typeface (i.e. one with those little projections and edges and curly bits - such as Times New Roman), instead of a sans serif typeface (i.e. one without those bits - e.g. Avenir). Serif typefaces generally make reading longer passages of text easier, but you often see sans serif typefaces used for contrast as headings or titles.

But typefaces also come in different weights and widths, some have bigger “X heights”, or longer “ascenders” and “descenders”, all of which can affect the look and feel of the text, even when the typefaces are the same size.
For example, here is a passage set in 10 point EB Garamond:

And here is the same passage set in 10 point Palatino:

Both fonts are the same size (10 point) and the same line spacing, but Palatino looks bigger and a bit more cramped, because it has a bigger X height (the size of the lower case x), and shorter ascenders (the part of the lower case letter that ascends above the main body of the letter - e.g. on b, d or h) and descenders (the line that drops below, such as with p or q).

This means that, even though both these fonts are the same size, they may require different line spacing or leading to appear at their best.
Leading
Leading (to rhyme with “wedding”) is the space between lines of text. With too little leading, text can look cramped; too much, and – apart from the wasted space (and printing cost) – it can look disjointed and affect the reading flow. The right amount of leading is partly determined by the typeface – which, as I’ve just said above, will have different characteristics that make it feel bigger or smaller, regardless of the point size.
In practice, the look and feel of a page is determined by all these elements – margin size, font size and style, leading – working together, and a choice regarding one element will affect the choices you make with others. There are some guidelines here which can help – for instance, that the leading should usually be 120% to 145% of the point size of the typeface – but really it comes down to the formatter’s sense of what looks “right”.
Bringing It All Together
OK, let’s see how this all combines. With my economic hat on, I’m going to format a page with the maximum number of words I can squeeze in. Let’s use Amazon KDP’s guidelines for this. So, on a 5x8 inch book with 250 pages, KDP will recommend a minimum of 0.25 inches (6.4 mm) for the outer margins and 0.5 (12.7 mm) for the gutter/inner margin. KDP also suggest a minimum of 9pt for the main body text, so let’s use that with a minimum leading of 120% (10.8 pt). Using my desktop formatting software (Affinity Publisher), this looks like this:3
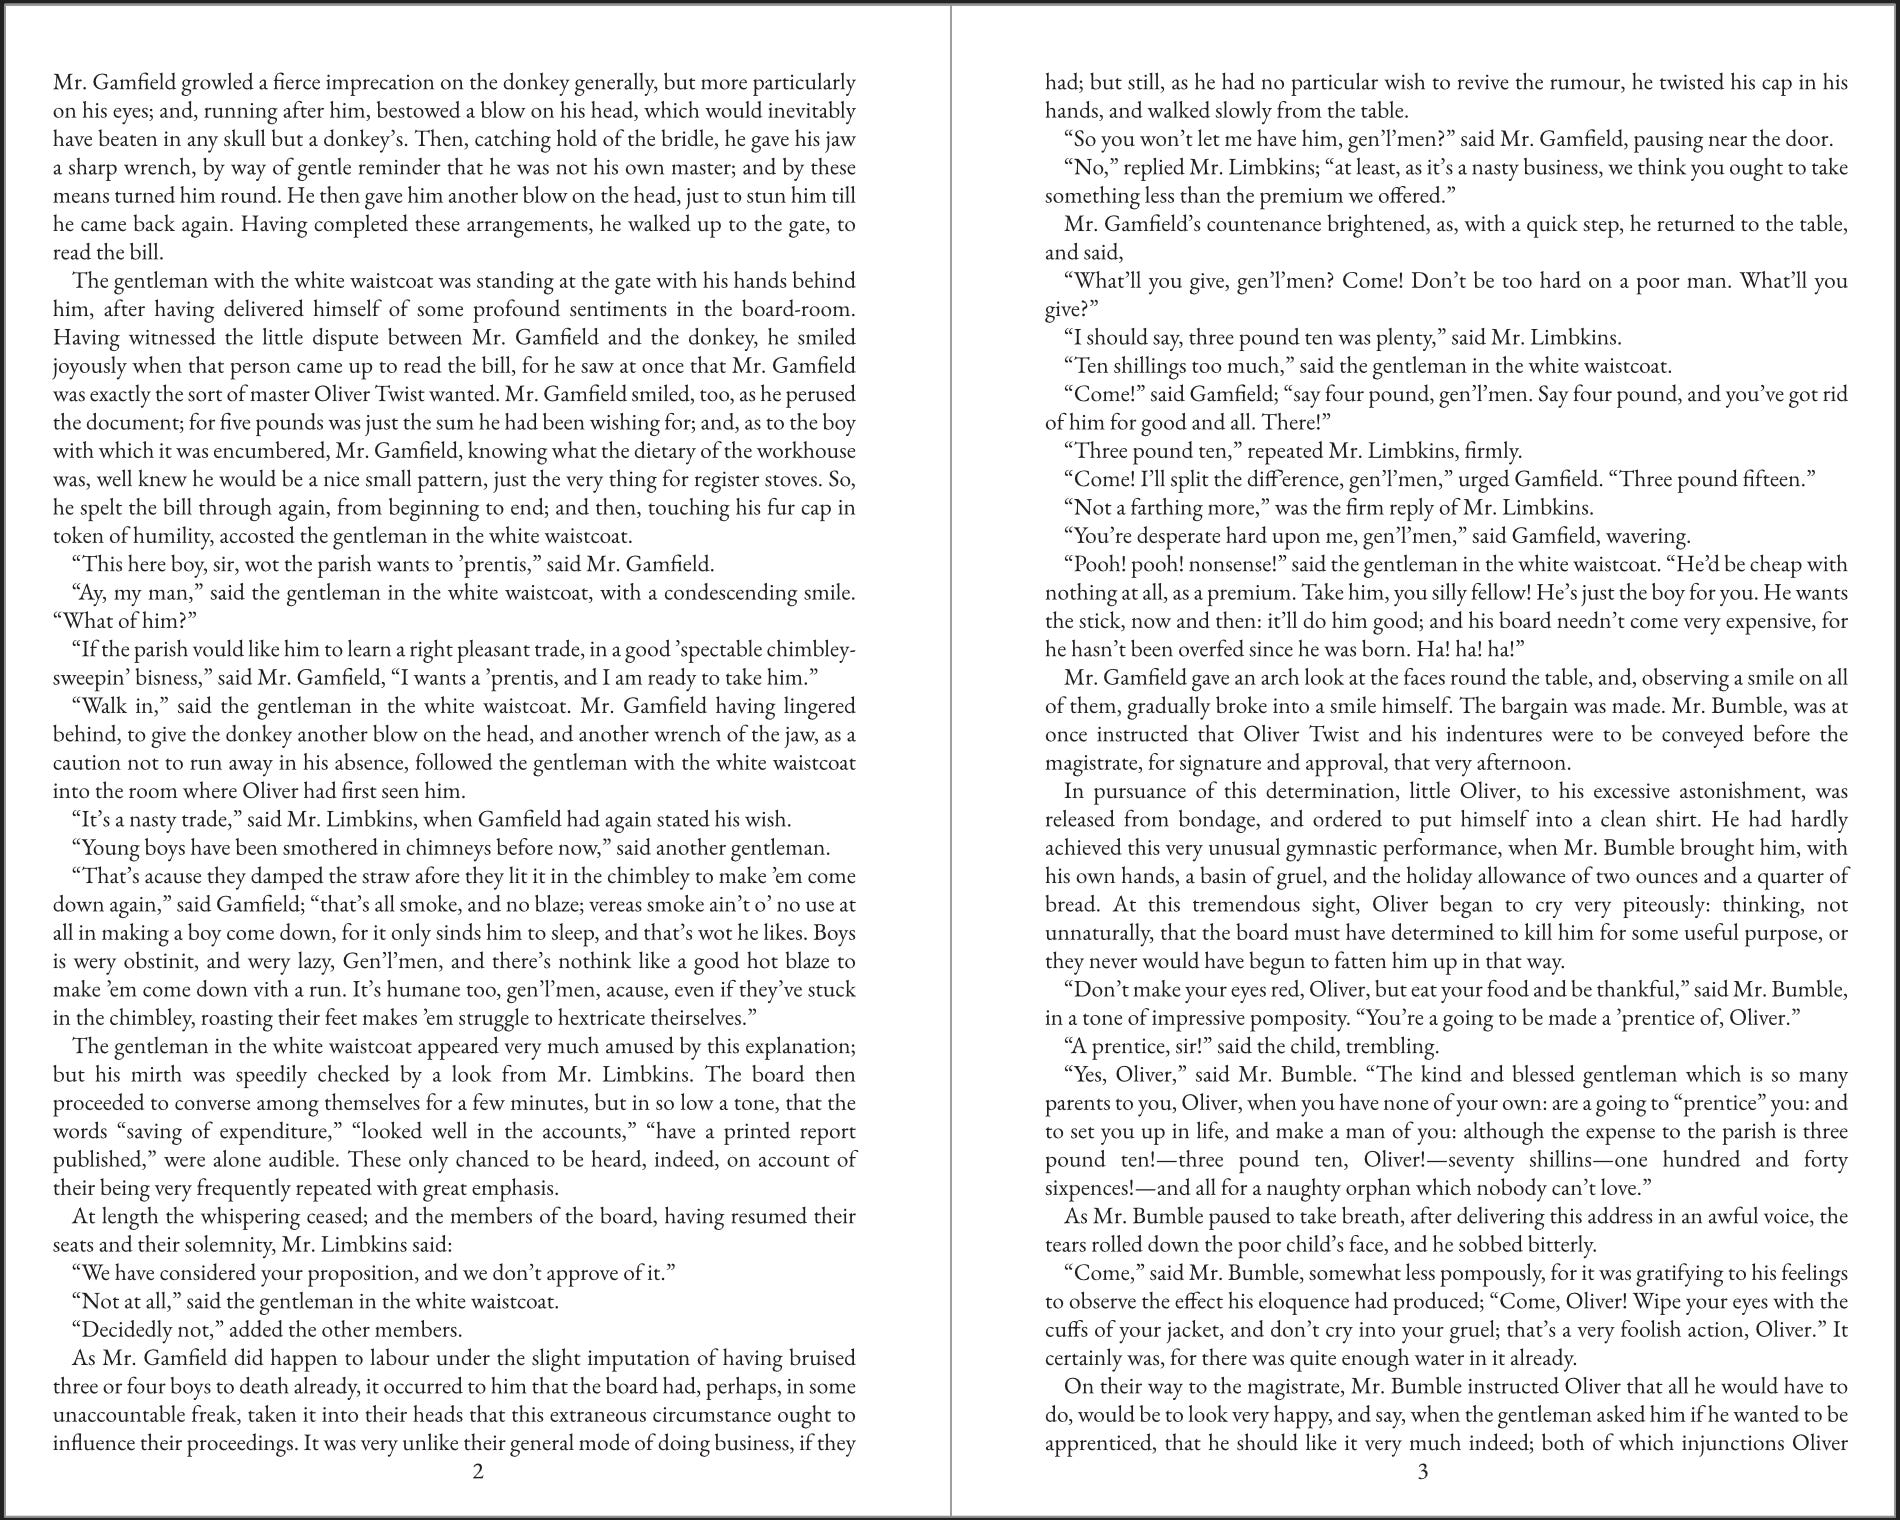
That looks pretty cramped, doesn’t it? And it would certainly have me wondering if I needed a new prescription for my glasses.
Now, let’s do a less penny-pinching version:
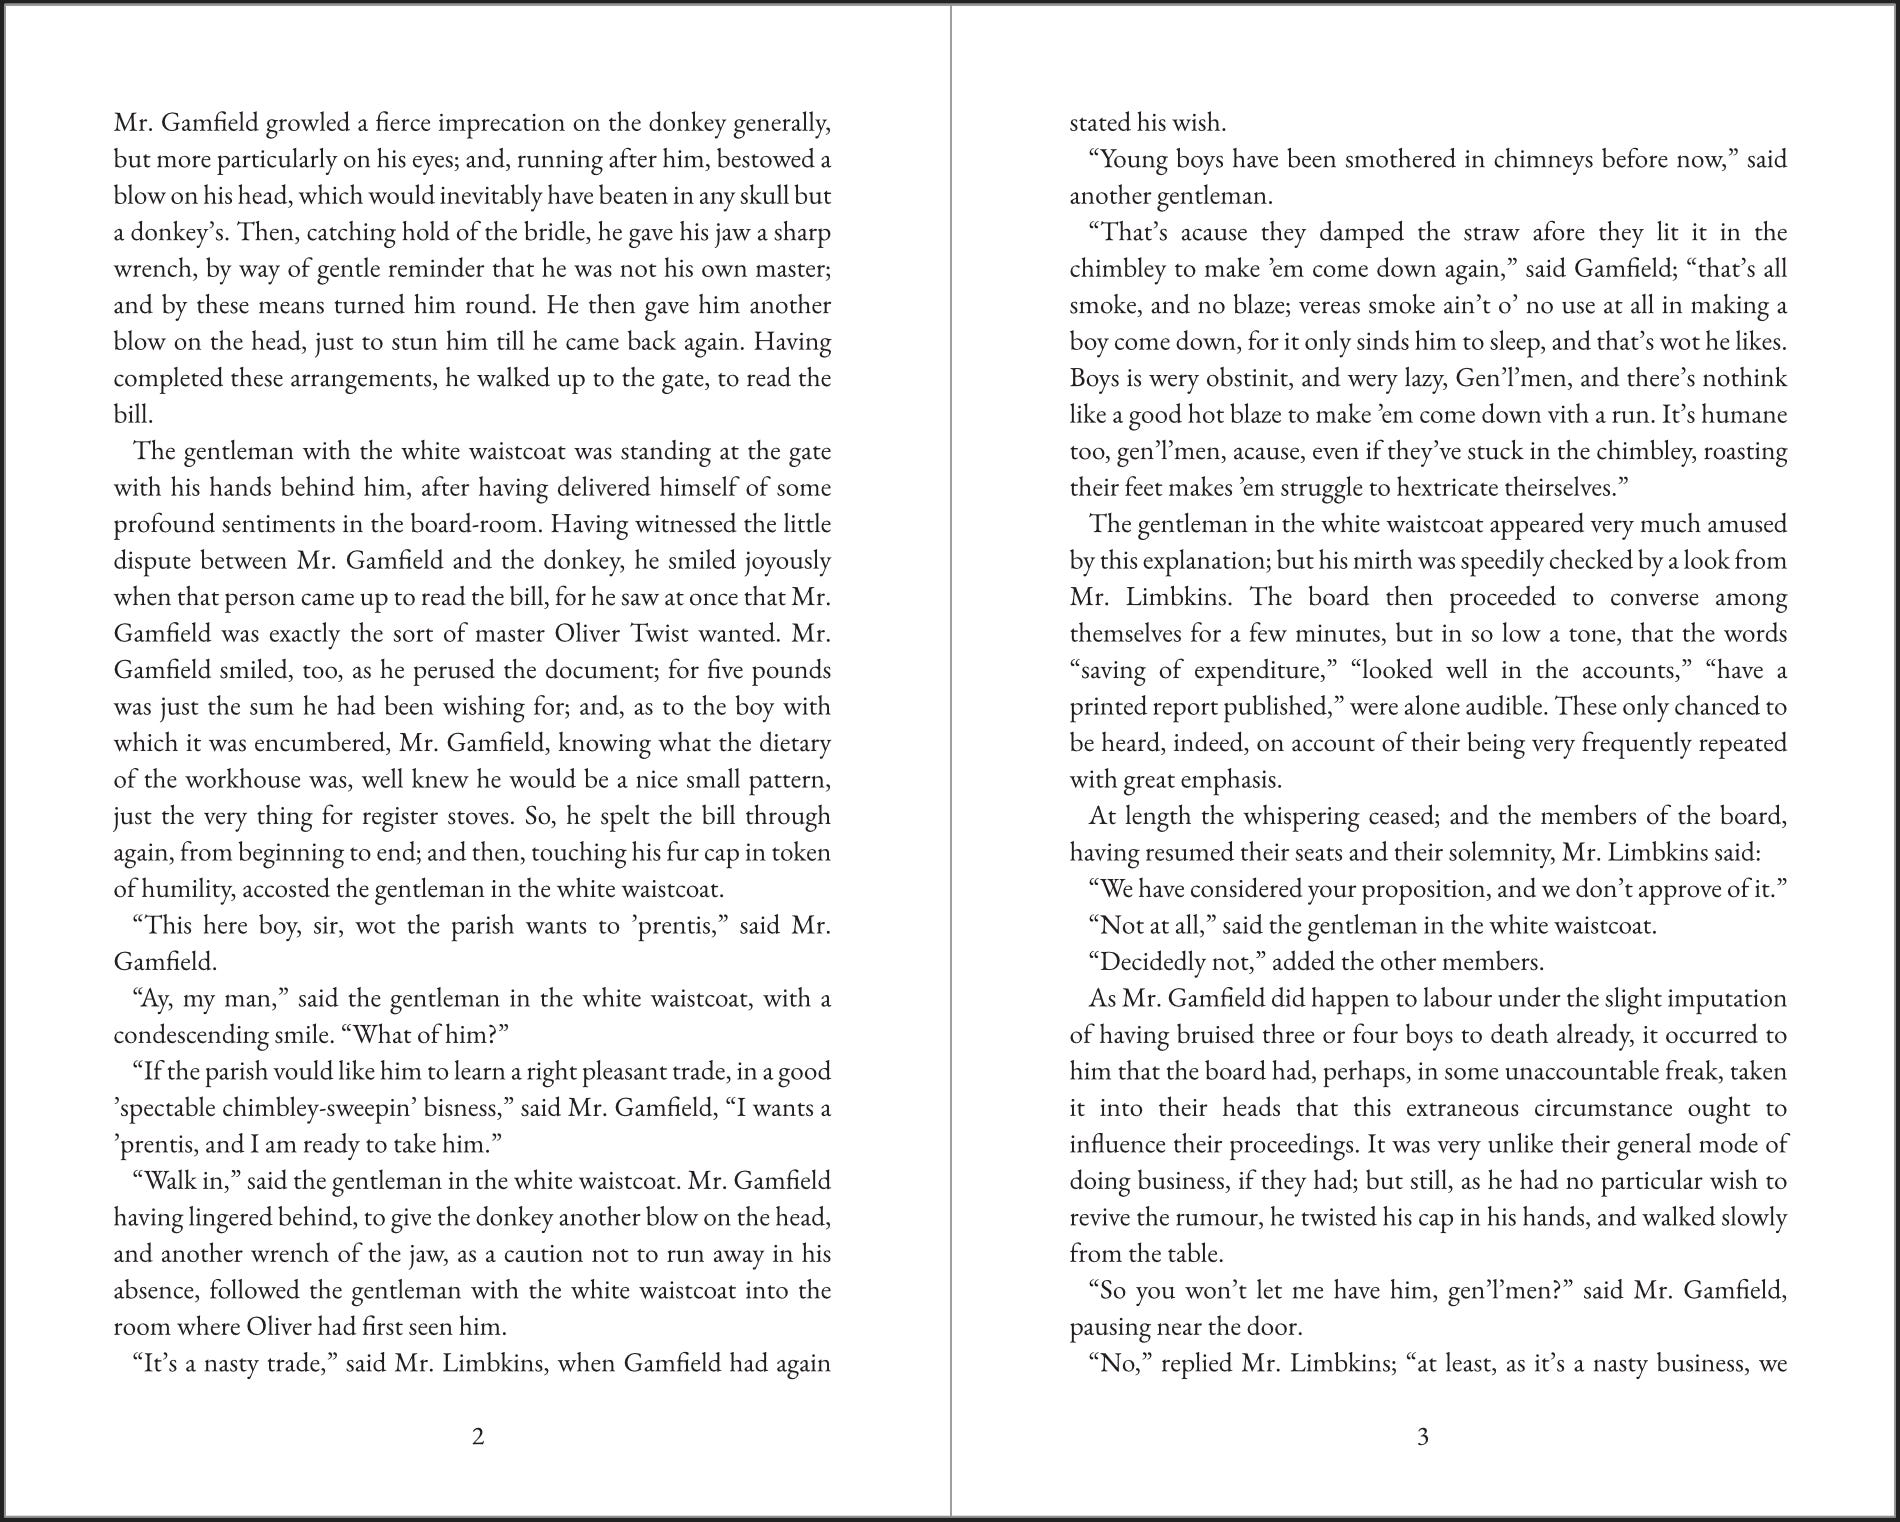
That looks better already. So, I’ve increased the margins so that the text panel (the measure) is about 80% of the page. The font is now 10.5 pt with a middling line spacing (leading) of 13.9 pt. We could go narrower on the text panel and increase the font size slightly, if we wanted to increase page count or give a sense of space and quality. Or we could increase the text panel/reduce the margins a little to save money/reduce page count. But what we have here is a decent compromise between reader enjoyment and financial publishing constraints, between art and economics. I think Dickens would approve!
Refining The Text
Now, all of the above is achievable in Microsoft Word, or some similar word-processing programme. You could also use something like the print version of Vellum or Kindlepreneur’s Atticus. All these programmes will also automatically handle the justification of the text, and the issues this sometimes creates, as well as so-called widows and orphans.
The primary job of a formatter is to make it as easy as possible for a reader. This means amending or removing things that cause disruptions or breaks in the reading process. I’ve annotated the pages with what I think should be done in order to achieve this:
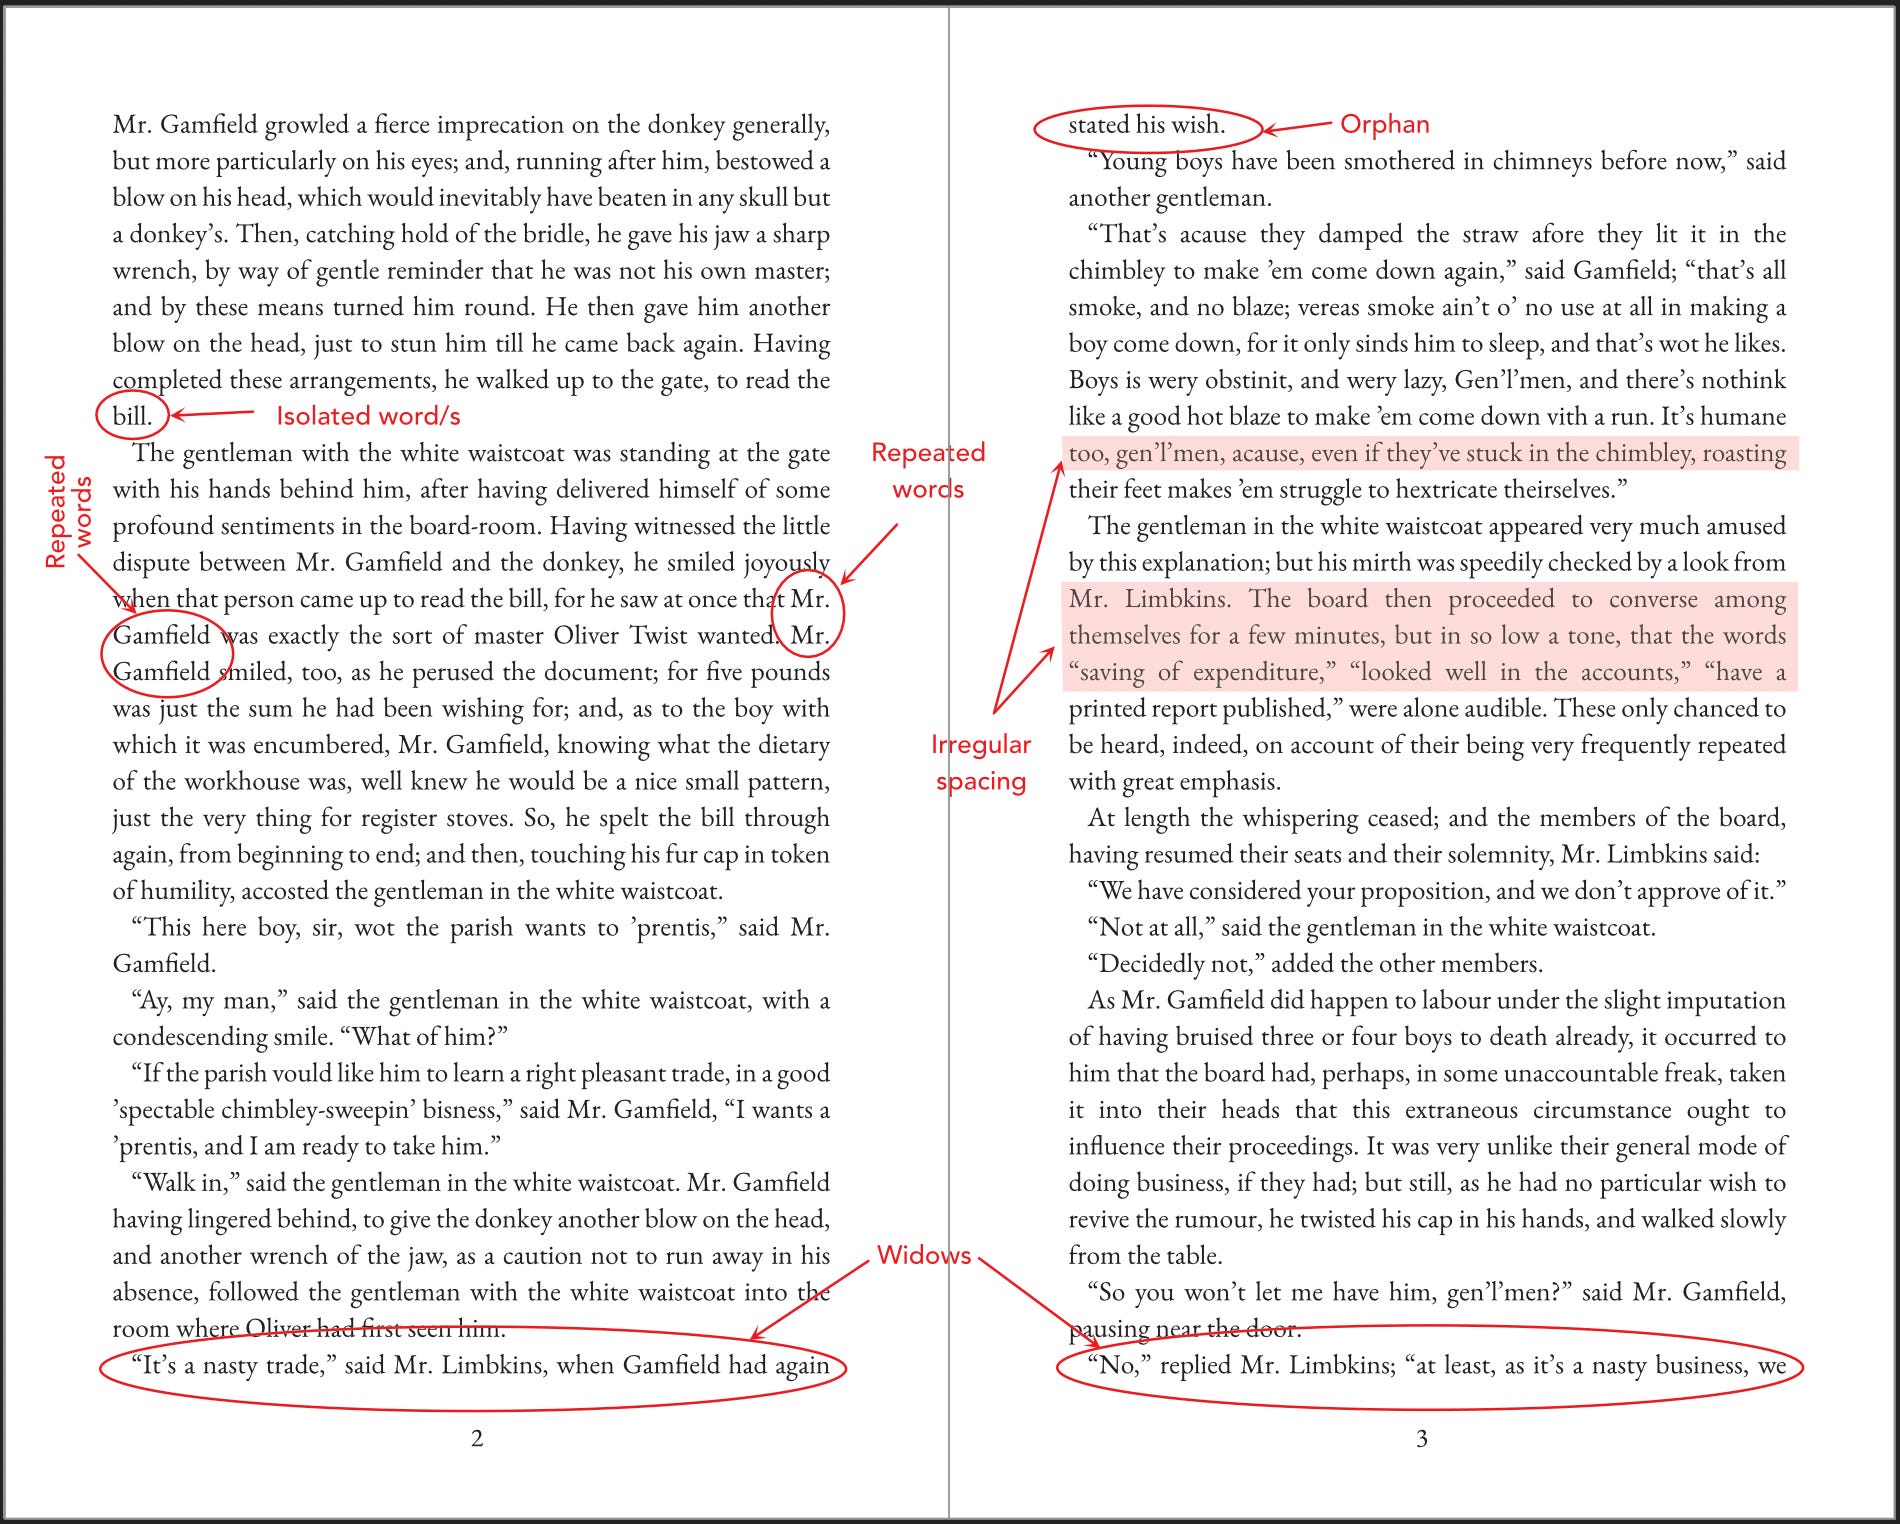
Isolated Words
Sometimes paragraphs end abruptly – for instance, here we have a “bill” on its own. This isn’t a crime, but it can ease the reading process if we either roll back the isolated word onto the previous line, or else turn over words from the previous lines to bulk out the last line in the paragraph.
Widows and Orphans
Another form of isolation is the creation of widows (the first line of a new paragraph at the bottom of a page) and orphans (the last line of a paragraph appearing at the top of a page).4
Repeated Words
The reading eye may also be tripped by repeated words at the beginning or end of consecutive lines (e.g. “Mr.” and “Gamfield” in the above extract). This can cause the eye to lose its place or start reading the wrong line).
Irregular Spacing
You can see here that in order to justify the text, my software programme has automatically increased or condensed the space between words, and in some places this has resulted in text which is too loose or too tight. The eye might notice this while reading as it looks unappealing.
Hyphenation
One thing you may notice about the extract is that it has no hyphenation. This is actually a bit of a bone of controversy among formatters, as some will argue that it should be used only when absolutely necessary, and otherwise we should prefer to put up with irregular spacing between words. Others will argue that it’s more important for the text as a whole to present a neat justified block with regular spacing (justified text has nice square edges on the left and right – except on the first and last lines of a paragraph – and is the industry standard for most fiction and non-fiction).
My own view is somewhere in the middle. Too much hyphenation risks being distracting, even if it presents us with a nicely uniform block of justified text. Furthermore, just as repeated words at the ends of consecutive lines should be avoided, we should also guard against repeated hyphens. However, irregular spacing between words can also be distracting and ugly, and not using hyphens robs us of a useful tool that can be used to address other problems.
Here is our text with hyphens.

I’ve highlighted two paragraphs where it’s made a difference. As you can see, the spacing in the highlighted paragraphs is now more uniform and less distracting. However, it has done nothing to help with the widows, orphans or repeated words – but it could…
Massaging The Text
Software such as Word, Atticus or Vellum will usually deal with hyphenation automatically (although not always optimally…), and you can set it to automatically minimise widows and orphans.
But there are also things that Word, etc, can’t do. You may have limited control over where exactly a word is hyphenated, and you will have little or no control over the amount of spacing between words. To modify those things, you need to use professional desktop editing software such as Affinity Publisher or Adobe InDesign. InDesign is the industry standard, but Affinity has made great strides in the last few years, and for most purposes is an excellent (and far cheaper) alternative.
To refine the text further, and to minimise widows, orphans, and isolated and repeated words, we therefore need to use a more powerful programme to do something called massaging the text. This is a delightful phrase that basically means to increase or decrease the space between words. Together with hyphenation, this allows us to minimise things that disrupt the reading process while creating an aesthetically pleasing page.
This is the final version of the text after it’s been “massaged”.
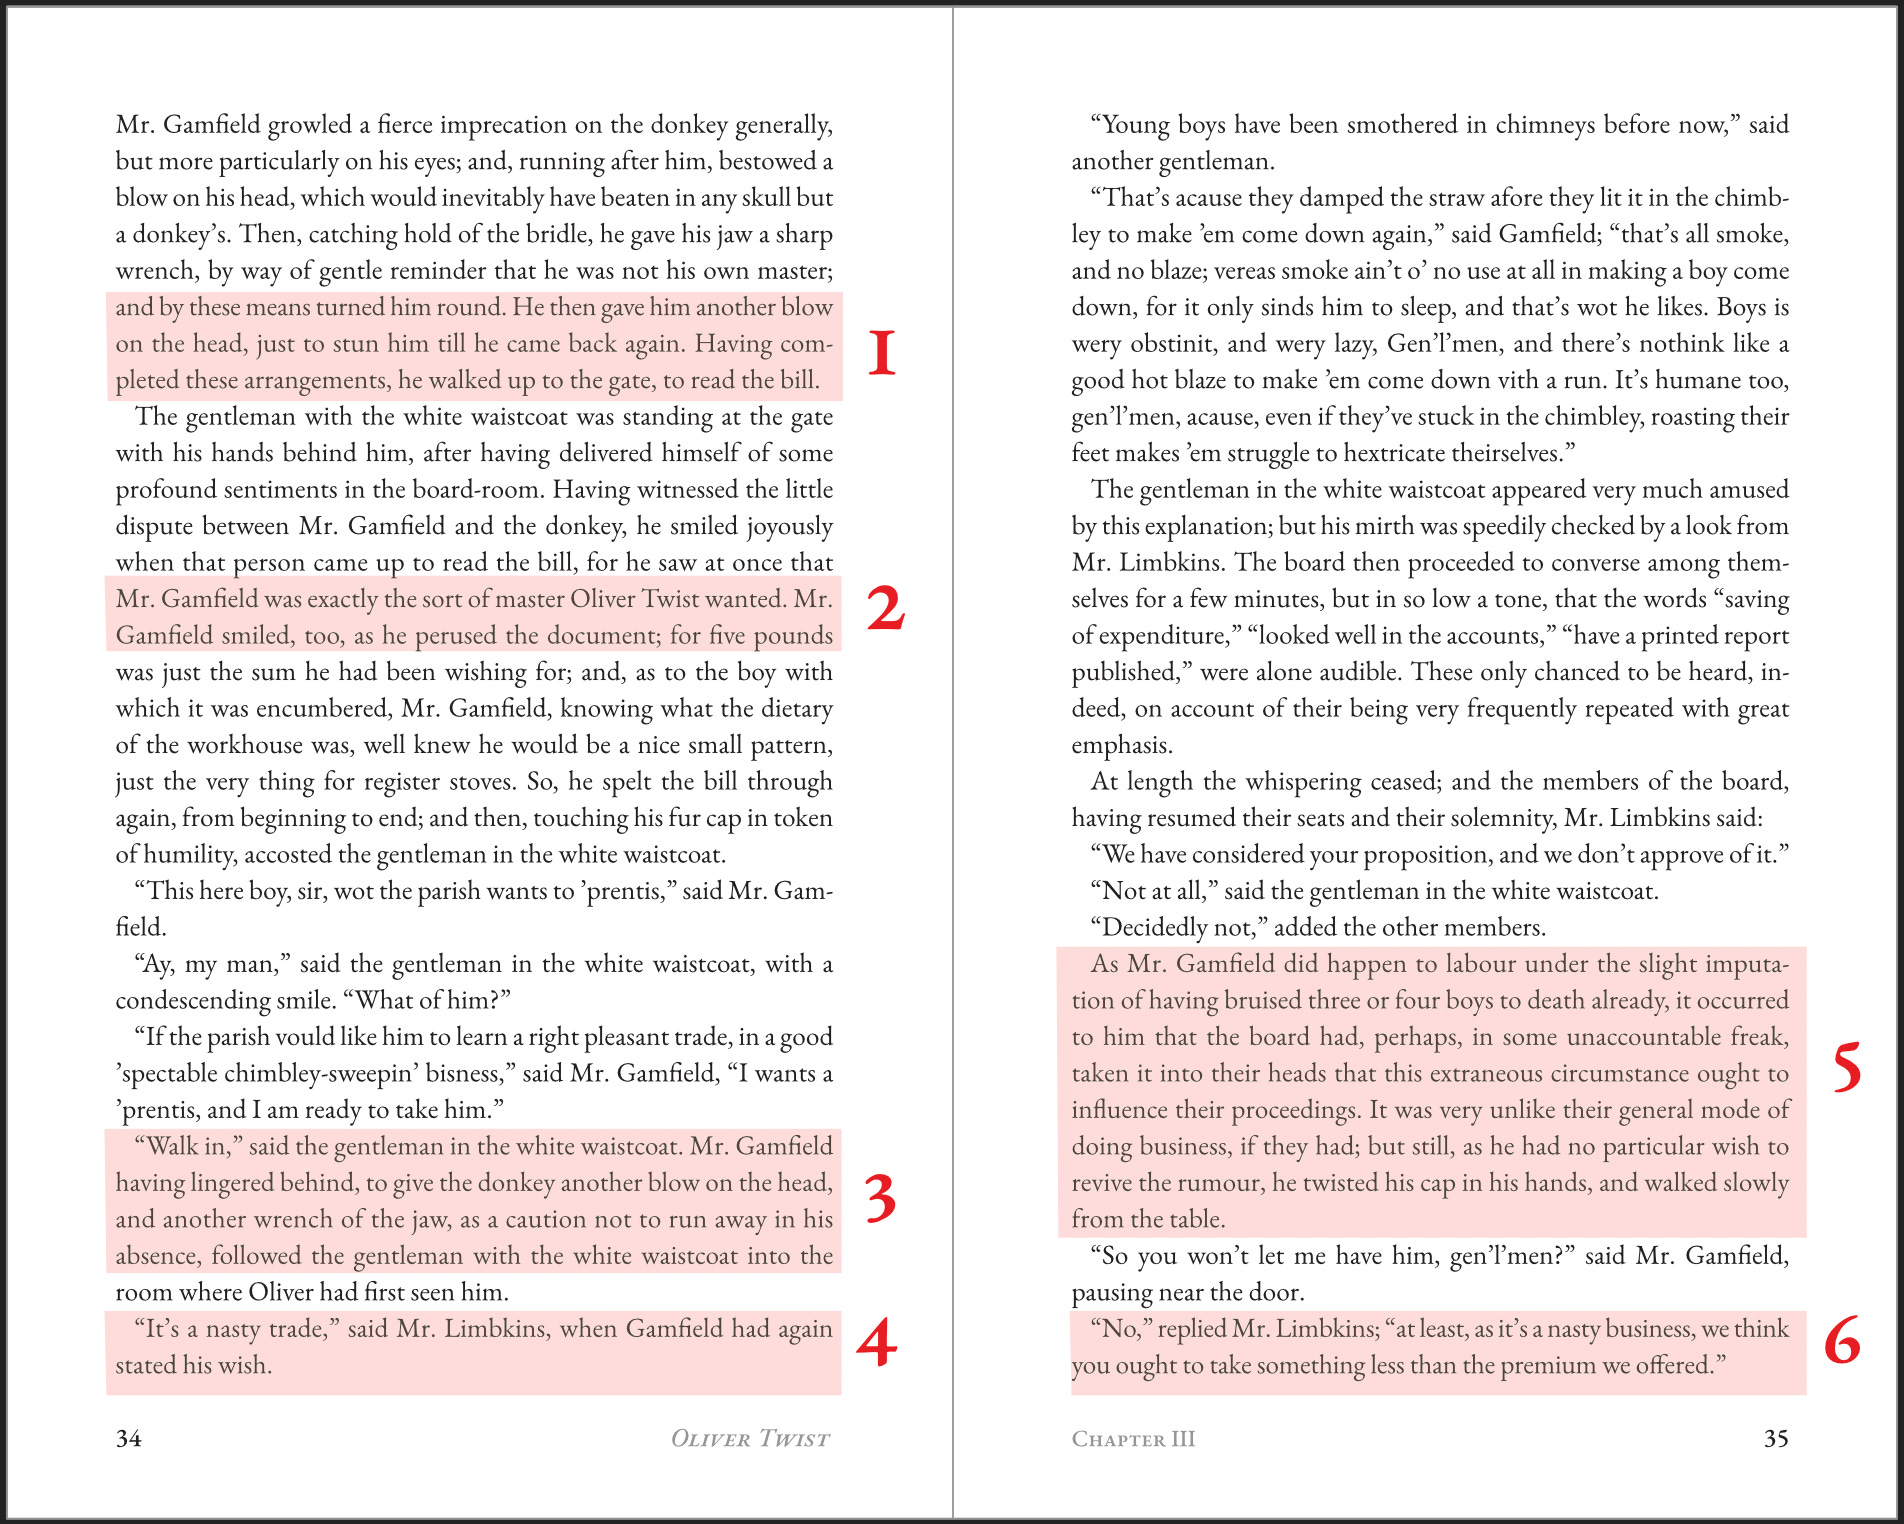
I’ve decreased the line spacing (tracking) on the line beginning “and by these means…” so that “blow” is rolled back onto the previous line, allowing more space on the penultimate line of the paragraph so that “bill” is no longer isolated.
I’ve decreased the spacing on the line beginning “Mr. Gamfield was exactly…” so that the other “Mr.” is rolled back onto that line.
I’ve increased the spacing on the line beginning “and another wrench…” to lose the hyphenation on “absence”.
Because “bill” was moved up a line in step 1, this creates another line at the bottom, allowing us to get rid of the widow and orphan that spanned the bottom of page 34 and the top of page 35.
Increasing the spacing on the first line of the paragraph hyphenates the word “imputation”, but turns over the next few lines so that the paragraph ends “from the table” (thus bulking out those isolated words from 2 to 3, and also getting rid of the repeated “the” at the beginning of the last two lines of the paragraph.
Step 1 also brings up a line so that we lose the widow at the bottom of page 35.
As you can see, this is quite a fiddly process. Losing a line on one page to eradicate a widow might create an orphan on another page. So there is a lot of back and fore and it can be quite an arduous and frustrating process. As you’ll see when you look at traditionally published books, different publishers will adopt different strategies for dealing with these issues – some ignore widows and orphans completely, some use minimal hyphenation, and so on.
From reading this post, you will also probably notice something that you hadn’t done previously: the varying space between words on different lines. It can be quite shocking what the eye can pass over without noticing!
So Is All This Worth Paying For?
I hope the above overview of the formatting process gives you a clearer idea of what is involved, and that you now have a better basis on which to make your decision as to whether formatting is something you should pay for. If you do decide to do it yourself, then as I’ve said, there will be aspects of the process that Word, Vellum or Atticus will give you limited or no control over. For that, I would recommend Affinity Publisher, and as a guide, Book Typography: A Designer’s Manual, by Mitchell & Wightman. It’s a steep learning curve, but a fascinating journey, and something you may find yourself interested in learning for its own sake.
Aside from the above work involved, of course, there is also to be factored in the knowledge and experience that a professional formatter will bring to the project. As I’ve said, there are a host of conventions and rules relating to book formatting with that you need to be familiar in order to produce a professional looking product.
So ultimately, it all comes down to how much you are interested in the subject, willing to acquire the skills needed, or have the free time to do it properly. If you do not, then the above overview will allow you to better gauge the knowledge and skills of those you might hire.
Good luck! Let me know how you get on.
All Things Independent is a series of occasional articles that covers all things indie publishing. From formatting your book, to creating a cover, choosing a publishing platform, marketing and advertising, getting into libraries and bookshops – I share my free lessons, tips, mistakes and (mis)adventures from my years as a writer, professional illustrator and book designer. If you have a question, correction or suggestion, please leave a comment and I’ll respond.
Typography is a broad term that covers the design and layout of text to make it readable and aesthetically attractive. Sometimes you hear it used to refer just to the principles and practice of font design. Typesetting or setting is the process whereby text is put into a text panel (the boxed space between the margins). Formatting is the process of putting text into a certain typeface, choosing the size, alignment, line spacing, etc, so that it fits within a certain “format” or trim size (e.g. a 5x8 inch trade paperback). Laying out and book design concern the sizing and position of elements on the page (text panel, headers and footers, page numbers, images, etc), and therefore concern the general page design. As you can see, there is a lot of overlap and opportunity for confusion regarding these terms, hence why I settled on “formatting”!
People often use “fonts” to describe all sorts of type, but strictly speaking a “typeface” is a subset of a “font”. So, for instance, the Palatino font contains four typefaces: italic, regular, bold, and bold italic.
This is an extract from Charles Dickens’ Oliver Twist.
You may find these words used in the opposite sense defined here. That’s not my fault. I have suggested that we create a generic portmanteau - widans, perhaps, or orphows – but so far this sensible solution has been resisted by my professional colleagues.
Acquainted me with what I didn’t know I needed. Very helpful.